
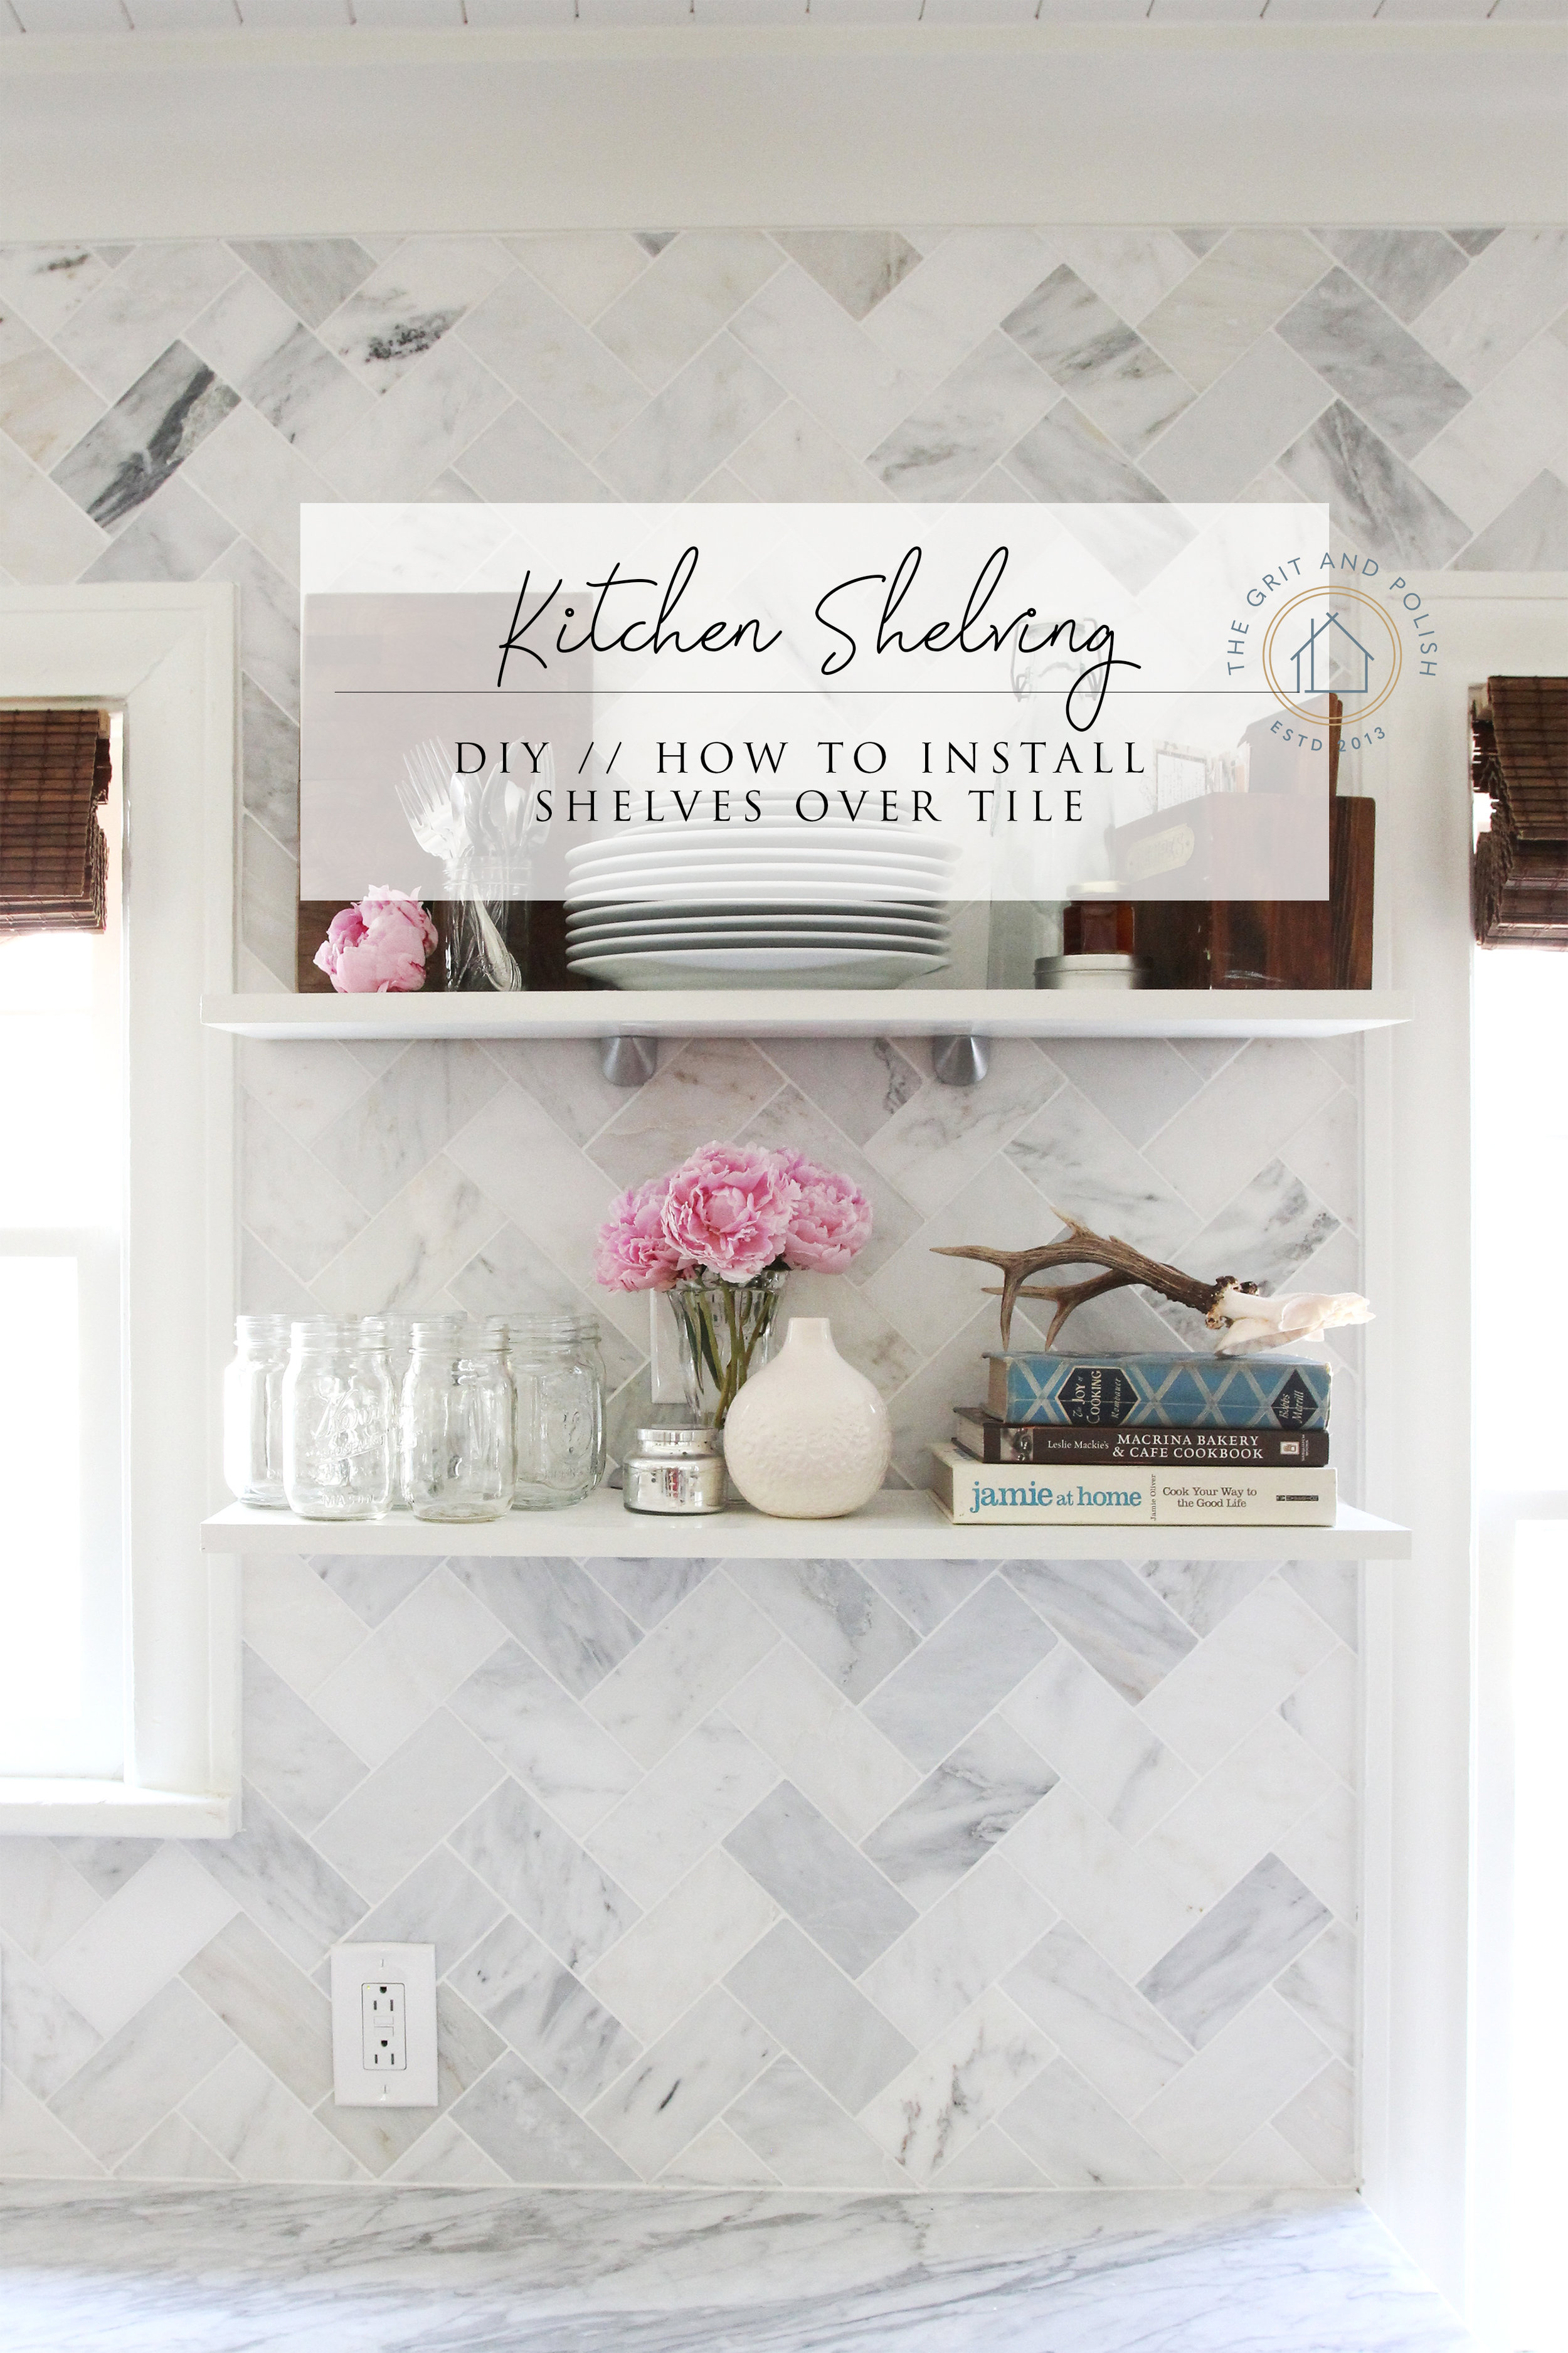
DIY // Installing Kitchen Shelves Over A Tile Backsplash
THE RAVENNA HOUSE
We've been plugging away in the basement for so long, that we haven't gotten a chance to tackle that pesky upstairs punch list. So this weekend, we carved out a little time to cross off one item: installing open kitchen shelves over the tile backsplash. I was a little nervous about drilling into the tile, but it turned out to be easy and painless. So I wanted to share a DIY today.
This project is coming at you because baby Wilder decided to take the longest nap ever. Three blissful hours, to be precise! During that time, our kitchen backsplash went from this:

To this:
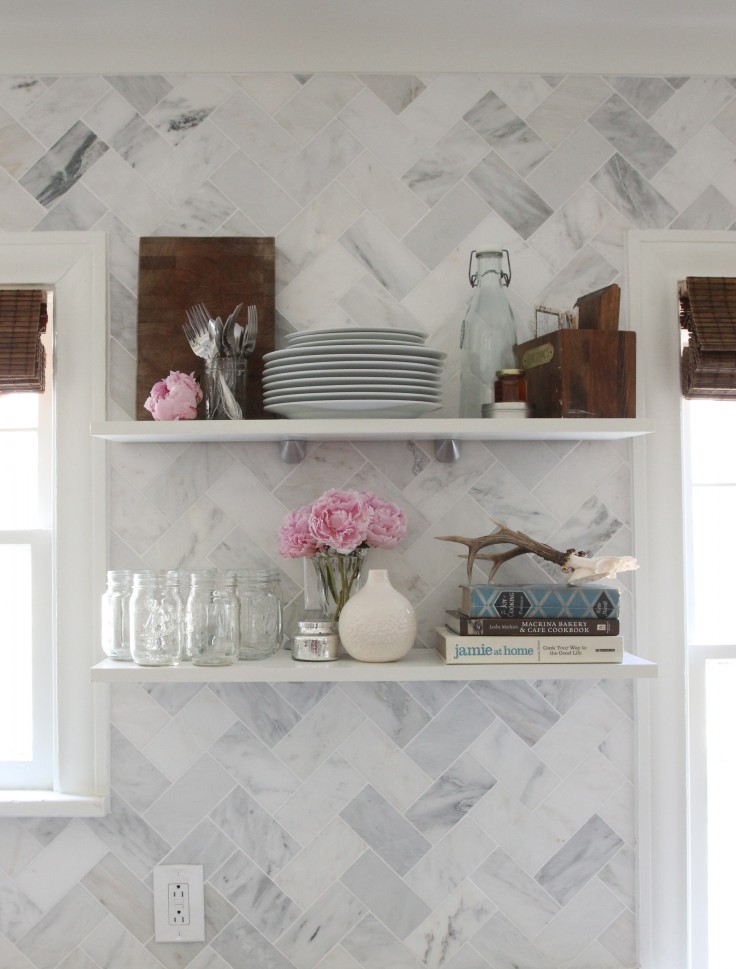
Oh how I love open shelves! We installed our's directly over the tile backsplash, which felt a little scary but didn’t end up being too hard. Read on for how to do it yourself.
What's on these shelves will evolve with time. In fact, they already have. It's a little surprise every time you walk into the kitchen. I can't be the only one that does this...right?!
how to install a shelf over a tiled backsplash
Okay, on to the install. Here's a quick materials and tool list in case any of you guys ever tackle mounting open shelves over a tile backsplash:
Materials:
Wood shelves, cut to length (we used a 1"x12" primed board)
Brackets + mounting hardware
Paint
Tools:
Paint brush
Cordless Drill
Diamond Tip Drill Bit sized for your mounting screws (we used this 1/4” one)
step 1 // prepare the shelves
Before installing the shelves, we cut them to length and then painted them with Sherwin Williams' alkyd enamel paint using a brush. I'm sure I could have gotten a teensy-bit nicer finish if I had sprayed them, but that would have meant hauling out the pneumatic sprayer (more on that process here). And that would have been way too much effort for two shelves. Luckily we had some paint leftover from the trim and ceiling in the kitchen, which Sherwin William's had matched to Benjamin Moore's Simply White. (update: I don’t recommend having Simply White matched, it always turns out too yellow!)

Step 2 // locate studs
You really want to attach shelves into studs. So we began by locating two studs. The first one we found by peering into the electrical outlet (we knew the outlet was nailed on a stud, and just had to look which side it was on) and then measured 16" over to find the second stud. We then drew a horizontal line at the height of each shelf.
Test fit your brackets and locate where the holes will go. Mark each hole with a pencil.
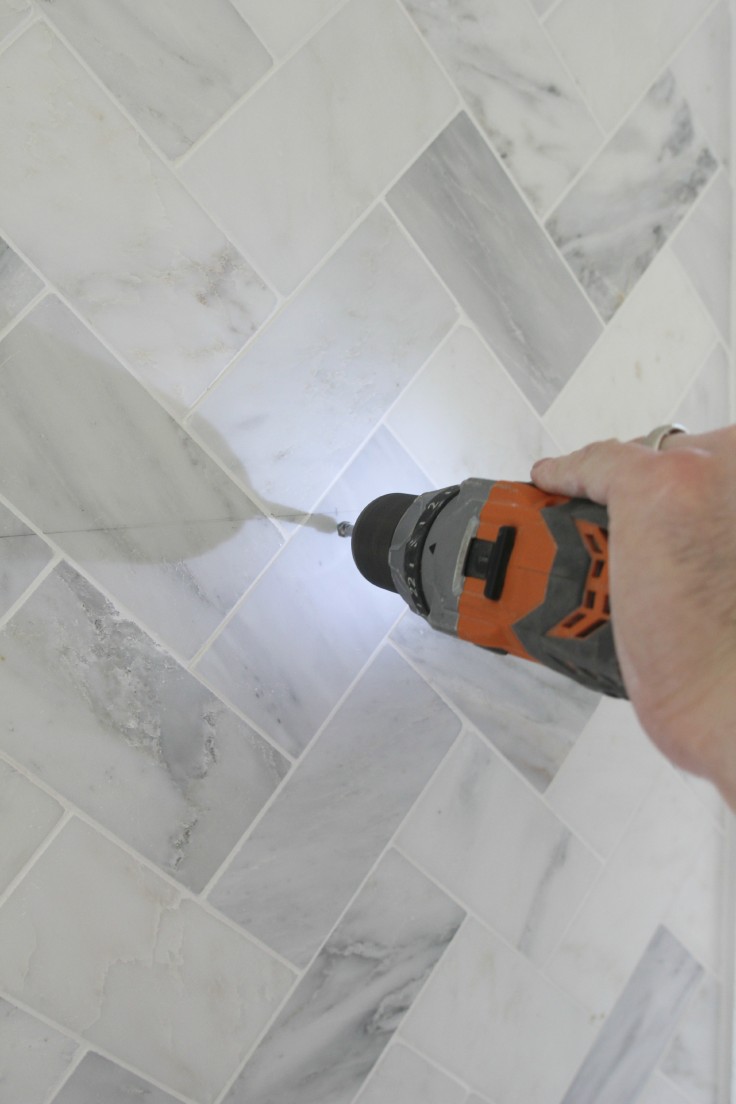
step 3 // Pre-drill holes
This is the scary part. With your diamond-tip bit on your drill, drill holes through the tile. Marble is quite a bit harder then wood and drilling these holes required a little extra muscle and patience to drill through. But we managed to get four holes into the tiles without any cracks in the tiles. Phew! (tip: if you’re worried about your tile cracking or sluffing, put painters tape on the tile before drilling).
Step 4 // install shelves
We inserted wall plugs (aka sheetrock anchors) into the holes. They came with the brackets. Since our drill made it into studs, we didn't really need anchors, but our 1/4" drill bit ended up being a little larger then the #10 screws that came with the brackets so the anchors helped fill the space.

Garrett claims that our brackets are rated for 100lbs each. It doesn't actually say that on the package but we'll go with it. They recommend a shelf depth of 10" but we went with 11 1/2". We like to live on the wild side, obviously. Of course our loading is fairly light (a lot less then 100 lbs per bracket - remember, we're going with that) so I'm not worried about the extra inch and a half.
Lastly, we set the wood shelves into the brackets, and then secured them with the set screws. And voila, shelves!

You may have noticed that outlet just above the lower shelf. We had the foresight to put it there in case we wanted to have a microwave on the shelf. Well it turns out that our microwave is too deep to fit there. But don't worry, all is not wasted. The outlet will come in handy if when we ever find a small and stylish radio for the kitchen. Mama wants to listen to Steve Inskeep while she drinks her coffee.
We did a quick pressure test by yanking on the shelves and deemed them strong enough to be in Wilder's house. Seriously that kid is strong. Someday he's going to be a sumo wrestler. Or maybe just a sweet, well behaved kung fu master.
The whole shelf DIY was over in less then an hour (minus painting) and that left the remaining 2 hours of Wilder's nap to style them. Yes, I really did spend 2 hours styling shelves. And I loved every second of it.
step 5 // style your shelves!
Of course an open shelf is only as good as it’s styled. Thankfully, styling open shelves is one of my favorite pastimes. Yes, seriously. We've put open shelving in every kitchen we have ever done, and it never gets old. You can put anything you want on them - pictures, fruit, plates, mirrors, flowers, art - the styling possibilities are endless. This time around, I stuck with a color palette of white, glass, silver, and pink. I just can't help but LOVE how these colors look together - maybe a little too feminine for a house with 1 lady and 3 males (counting Bubba the dog, of course) - but what's a girl to do?
These shelves are filled with practical items like glasses, plates, and silverware and slightly-impractical-but-seriously-lovely things like peonies and antlers. And when those mason jars are not filled with homemade raspberry jam or dill pickles, we drink out of them.


And that’s it. The entire process for installing open shelves over a tiled backsplash. I’d love to hear if you use this DIY! If you’re looking for other DIY shelf idea, I loved this DIY ladder shelf that my friend Bre created, and these open shelves that Ashley built.
sources
Blinds: Home Depot | Marble Tile: Home Depot | Trim Paint Color: BM's Simply White | Cook Books: Amazon, Amazon (or stop by the Bakery if you're in Seattle - you won't be disappointed!), and Vintage | Best smelling candle ever: Anthropologie | Brackets: Amazon | Glass Vase: vintage milkshake glass | White vase: Crate and Barrel (no longer available) | Light: Home Depot | Chandelier: West Elm | Weck jar: gift from my sis (but you can find it here) | Cutting board, recipe box, plates, and silverware: collected/inherited/gifted
Once we get this room all buttoned up (and cross a couple more items off the punch list) I will do a big kitchen reveal and show you every nook and cranny of our little space. Until then, you can read about the faucet, backsplash, and a kitchen party (here, here, and here).
xoxo
p.s. A huge thank you to Dana Miller of House*Tweaking for last week's shout out! Glad this little house of ours could make her smile.
p.p.s. A ridiculously-funny ranking of HGTV home improvement shows. Do you agree?
p.p.p.s. This had me cringing. This had me laughing. And this had me hoping our next house is brick!
**post updated 08/17/2019